


Button Placket Blouse
This style is a pretty summer blouse created by Robyn de Pyper from Australia. This project is perfect for beginners just learning to use the PatternMaster Pattern Editor.
Robyn chose a mandarin collar and jewel neckline. This button placket technique can be used with many of the PatternMaster silhouettes and necklines in all of the PatternMaster programs. The jeweled vee neck with the mandarin collar and button placket would very stylish. The rectangles for the bands and placket can be created in Pattern Editor or with a pencil and ruler.
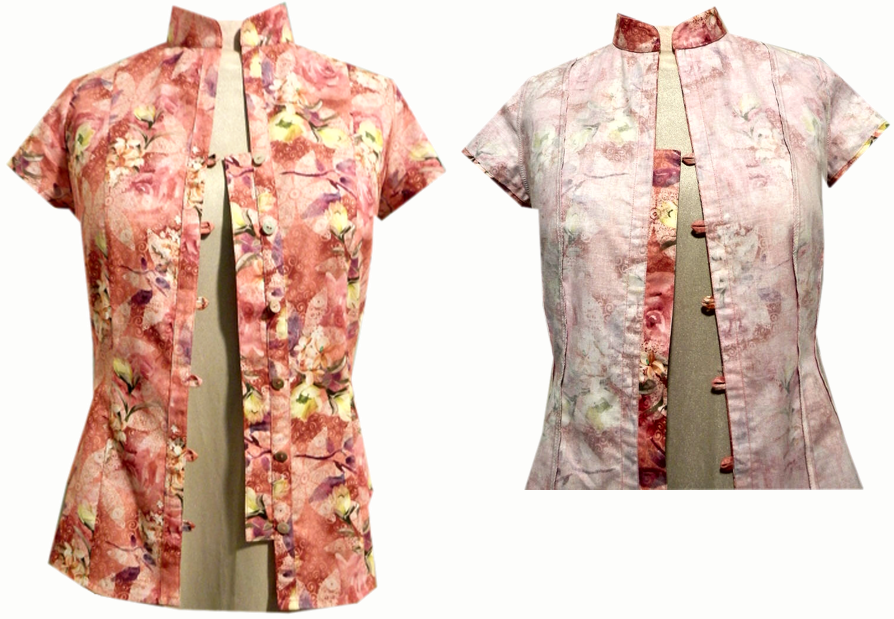
Summer Blouse with Button Loops and Placket
Robyn writes:
"I did not actually put in a zipper, I just chose that option because I only wanted a seam allowance on the centre front without an extension so I could use button loops on the right side and add a placket to the left side. The seam allowances on the centre front, button loops and placket are enclosed under the bands down each side of the front opening. I would normally add a facing to the inside as well but I was a little short of fabric."
To recreate Robyn’s style choose the following PatternMaster options.
- classic blouse
- front and back jewel neck
- front zipper
- shoulder princess front and back
- full cap sleeve
- set length as desired
- set front and back neck depth as desired
Save the Style
- Save the style as Button Placket Blouse and then choose to open the patterns in the Pattern Editor.
- Go to File/Save As and rename the pattern file to Button Placket Blouse Bands.
- Select and delete all of the patterns except for the front pattern.
Make the Patterns
To make the front bands (Fig. 1):
- Measure the length of the center front seam.
- Draw a rectangle the length of the center front seam and 1 inch (2.5) wide or as desired.
- Using the Offset and Intersect tools, add seam allowances around three sides and the hem allowance on the bottom the same width as those on the front pattern.
To make the placket (Fig. 1):
- Draw a rectangle 8 inches (20 cm) shorter than the length of the center front seam and 3 inches (7.5 cm) wide. This should result in a placket that is 5 inches (12.5 cm) down from the neckline at center front and 3 inches (7.5 cm) up from the hemline.The placket will be folded in half lengthwise for a finished with of 1 1/2 inches (3.75 cm).
- Using the Offset and Intersect tools, seam allowances around all four sides the same width as those on the front pattern.
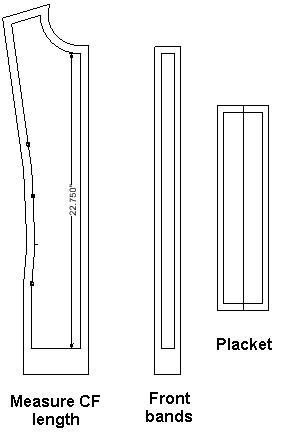
Figure 1. Make the patterns
Print the Patterns
- Select and delete the objects for the front pattern.
- Select all of the objects for the front band pattern and choose Group Objects (GP) from the Utilities menu.
- Select all of the objects for the placket pattern and choose Group Objects (GP) from the Utilities menu.
- Print the front band and placket patterns.
Sew the Placket
- Cut one placket from fashion fabric or contrasting fabric, if desired.
- To construct the placket, interface one side to the foldline, if desired.
- With RIGHT sides together, fold the placket in half lengthwise (Fig. 2).
- Stitch across the top and bottom short ends of the placket.
- Trim the seam allowances and turn right side out and press.
- Press one long side of each band to the inside along the seam allowance (Fig. 2). The bands do not need to be interfaced.
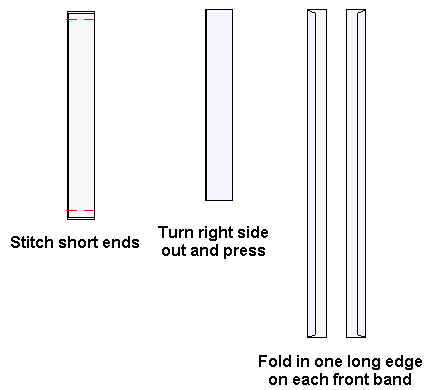
Figure 2. Stitch the short ends
- On the LEFT side of the blouse front, pin the placket to the WRONG side of the LEFT blouse front 5 inches (12.5 cm) down from the jewel neck at center front (or as desired).
- Baste in place (Fig. 3).
- Pin the RIGHT side of one band to the WRONG side of the LEFT blouse front matching the raw edges.
- Stitch along the seam line (Fig. 3).
- Trim the seam allowances and press them open.
- Fold the band to the outside of the garment along the seam line and press.
- Top stitch along the folded edge (Fig. 3).
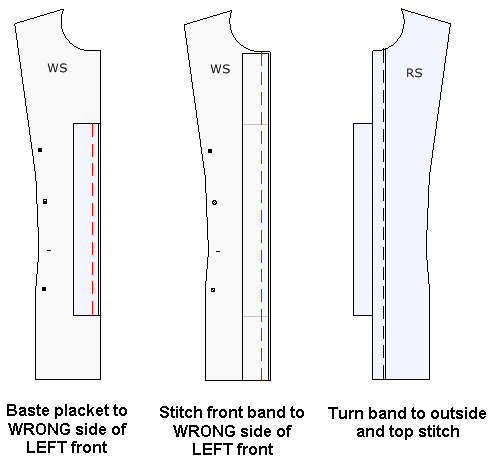
Figure 3. Attach the placket and front band
Sew the Button Loops
- Make the button loops from narrow bias tape, self bias binding, ribbon, or cording as desired.
- Cut two front bands from fashion fabric or cut two from contrasting fabric, if desired.
- On the RIGHT side of the blouse front, position the button loops on the WRONG side of the blouse front along the center front seam as shown and spaced as desired. The top button loop should be match the top of the placket and the bottom loop should match the bottom of the placket.
- Baste in place (Fig. 4).
- Pin the RIGHT side of the other band to the WRONG side of the RIGHT blouse front matching the raw edges.
- Stitch along the seam line (Fig. 4).
- Trim the seam allowances.
- Fold the band to the outside of the garment along the seam line and press.
- Top stitch along the folded edge (Fig. 4).
- Stitch the buttons along the placket on the LEFT blouse front matching the button loop placement (Fig. 5).
- Finish the garment according the sewing guide sheet.
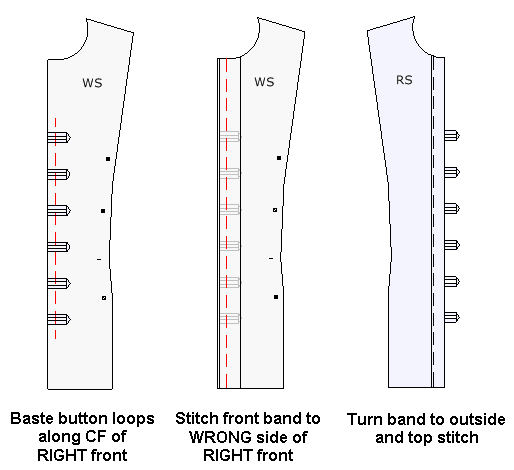
Figure 4. Attach button loops and front band
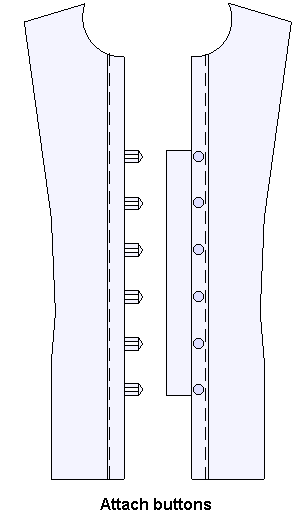
Figure 5. Attach buttons